Sundown

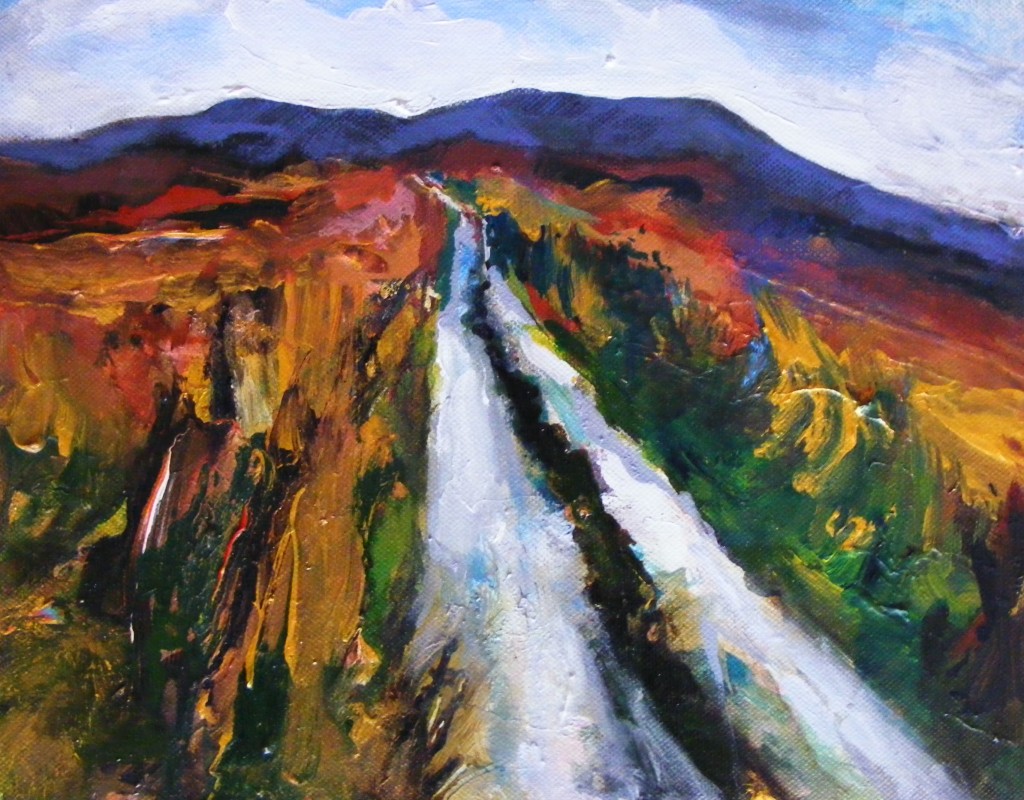
I went out to the Bog Road between Clifden and Moyard last week. It was about 5.30pm and the light was really beautiful, low and clear. The colour of the bog grasses was striking – rich metallic shades of gold, copper and bronze. There was still some warmth left in the sun but the wind had a bite to it which isn’t evident in these pictures – the colours are so deceptively warm, it could be some hot and arid place..


Photograph of bog by Deborah Watkins


I wandered down this road to get a better look – a typical Irish side road with impressive pot holes..


Road with pot holes


Mmmm, need a tractor to get through this next bit, good job I brought my wellies..but just look at the blues reflected in this pool.


Photograph of flooded road by Deborah Watkins


One last picture, I like the way the hill peaks over the top of the road in this one.


Road through bog by Deborah Watkins


The Dash

Spring might just be on it’s way after all. We’ve had a whole week of dry weather which is very welcome indeed after all the rain we’ve been having since Christmas. Although it is very cold ( oh yes that wind can slice the skin ) it is a tonic to have clear blue skies overhead and to feel the sun again. My garden is slowly beginning to recover and harden from the sludgy waste ground it had become. There are spots of colour too reaching out in the few daffodils forgotten since last year and the bursts of new growth by the roadside. Every bit of this is long awaited, long earned.

I came across a poem which expresses this beautifully. It is called ‘The Dash’ and it is written by Kathleen Jamie whose book ‘The Overhaul‘ was shortlisted for this years Costa Book awards. Kathleen is from the West of Scotland and her work has been honoured with many awards throughout her career. ‘The Overhaul’ is a collection of poems which seem to breathe the landscape where Kathleen is from. There is an engaging use of Scots speech in her poetry, much of which has similarities to gaelic and this gives the writing warmth and musicality. There are many similarities between Scotland and Connemara – the wildness and the ferocity of nature’s relationship with the land and the gentleness of it too – the beauty of the everyday and all it’s treasures.


The Dash


Every mid-February

those first days arrive

when the sun rises

higher than the Black

Hill at last. Brightness

and a crazy breeze

course from the same airt –

turned clods gleam, the trees’

topmost branches bend

shivering downwind.

They chase, this lithe pair

out of the far south

west, and though scalding

to our wintered eyes

look; we cry, it’s here


Kathleen Jamie


Image of Hawthorn by the roadside by Deborah Watkins

It’s a Hens Life

This post was inspired by fellow blogger, musician and writer Robin McArthur who recently invited me to send some pictures of my hen house for her blog. Well that just got me thinking about my own hens and how much I value them.

We decided to get some hens three years ago this Summer. It was something I’d hankered after for a while, inspired in part by stories about my Great Aunt Rita and her brood of hens in inner city Dublin a generation ago. She would invite her nieces and nephews to put cocoa in the hen food on Easter Saturday which miraculously turned into chocolate eggs for Easter Sunday, a treasured memory of my mothers. These hens would have been more than a fancy, they would have provided food for the table – breakfasts and suppers and supplies for baking. This lady made a wonderful Buttermilk cake with egg which my mother and I make regularly today – I think of Rita when I make it myself.


Bottoms up!

Bottoms up girls!


There is something important about these simple values – good husbandry and good housekeeping that we are beginning to return to. The pleasure that these productive creatures bring is hard to quantify.

Getting started does involve some work however and some investment. You will need a secure coop with nesting boxes and a safe run for your hens to exercise. Our hen house was a gift from my Dad. It’s a very handsome one and suitable for up to six hens.


Winter coop

Our coop with three hens – ‘Pip,’ ‘Cocoa’ and ‘Muffin’


We started off with two Rhode Island Reds which we were told are the best layers. We reckoned two hens would provide ample eggs for our family’s needs. I had been advised that having too many hens and therefore a lot of eggs is a consideration since you then have to then decide what to do with the surplus. If you have lots of family and friends who would welcome the eggs on a regular basis then this might not be an issue but the eggs still have to be collected and delivered. Once your coop and run are secure, the main threat to your hens is human error. I learnt this the hard way when I left the coop open for the first time in almost two years and the fox took both hens overnight. I’d been in Galway for the day and came home late, forgot to assign the job to another family member and forgot to check myself. I thought that this was just very bad luck but an expert later told me that the fox most likely goes round all the gardens every night. One error is all it takes for a happy fox and a very unhappy hen owner.

After a suitable mourning period ( we have three young daughters ) we decided to get three hens, one for each girl, which they chose themselves. This new brood consists of two Rhode Island Reds and one Bluebell. The Bluebell doesn’t lay as frequently as the Reds who produce one egg each every day but I believe that her laying life will be longer so she will be productive for more than two years. It’s an impressive production and something I feel grateful for on a daily basis – such hardworking girls! If your hens are happy, well fed and have as much roaming around room as possible, they will lay well. They need a bit of extra care over the Winter ( as do we all ) and so you need to make sure they are reasonably warm in low temperatures. I line the coop with cardboard and put a thermal picnic blanket and an old carpet over the top of the house for insulation.

I am the chief hen caretaker in our family and taking care of them is now a part of my daily routine. It takes me less than ten minutes in the morning to let them out, clean out the coop and put out enough food and water for the day. I usually check up on them during the day and I lock them up in the evening  – they can’t see in the dark so they usually make their way in themselves at dusk. I simply could not recommend this way of life enough and apart from the trauma of losing them to the fox ( may you learn by my mistakes! ) I cannot think of a single reason not to have hens. Did I mention that they make excellent models for painting?


second hen - third stage


Hen painting in progress


I leave you with my Aunt Rita’s recipe which is especially nice on the day it is baked with butter and hot tea.


Rita’s Buttermilk Cake

2 Breakfast cups Flour

2 oz margarine

1 tsp baking powder

1/2 tsp bread soda

1/2 tsp salt

3/4 cup sugar

fruit ( a generous handfull of raisins )

1 egg

8 fl oz Buttermilk or sour milk


Sieve flour into a bowl. Add baking powder, bread soda and salt. Rub in margarine. Then add sugar and fruit. In a separate bowl, beat the egg with the buttermilk. Add this mixture to the dry ingredients with enough milk to make a stiff batter. Pour into a greased tin ( I prefer a large loaf tin – my Mum likes to use an 8″ cake tin ) and leave for 15 mins before putting into a moderate oven ( 170 degrees ) for 45 mins. You’ll know it’s cooked when it becomes a warm golden brown colour and the base should sound hollow when you turn it out.


Underneath


This painting below is one I made towards the end of last year. There’s something about it, something accidental that happened that really works. I want to replicate it on a larger scale to see if I can work out what this is exactly. I also want to introduce some of the textured paste I used in my last piece which I think will lend itself well to this composition. Finally, I’m keen to find out if I can change the scale of a small piece like this ( 6″ x 8″ ) and still keep the essence of it intact. I was reading some of Seamus Heaney’s poems at the time about the bog bodies and I love this idea of the bog as a resting place, a secret tomb.


Original 'Black Bog' painting


Here’s how I began below. The canvas is 12″ x 14.5″ x 2″


First stage of painting


Next I applied some paste, scooping it onto the canvas with a brush and then working it with several brushes, sometimes with the wrong end of the brushes to make sgraffito type lines


Landscape with a layer of textured paste


Here’s some close ups of the different textures. I love the variety of marks that are possible – thick raised pieces and scratchy sinuous lines. Hopefully it will give the finished piece some real depth.


Close up of texture


Second close up


Once the textured paste had dried, I began to paint the middle and foreground of the canvas. I worked quickly with paints and inks, taking advantage of the way the two materials behave together. I didn’t pause to take pictures along the way until I was satisfied that I had the results that I wanted. This next photo was taken after a couple of days when the colours had almost completely dried. The black/brown of the bog has a leathery feel to it that I am very pleased with but was difficult to photograph without getting too much shine.


Textured landscape with colour


Here are some close ups.


Close up of Landscape


Second close up


The next part of the painting I worked on at this point was the mountain nearest the bog. I had painted it with ultramarine blue which just looks too ‘straight out of the tube’ and is too distracting. I mixed up a slightly duller colour (below), truer to the blue silhouettes that you see here. I want these mountain shapes to be flat and serene looking to contrast with the energy and life of the bog.


'Underneath' Landscape - finished piece


I am very happy with these results as I think I have hit on the essence of this piece and the direction that I would like the paintings to follow from this point. It’s the intangible nature of this place, the idea of life underneath the surface and more. The composure of the landscape on the surface versus the darkness and unrestrained nature  of the layers underneath. More work to do!

Texture

Connemara Sheep by Evie Lavelle

I’ve been working on this large landscape. It’s 12″ x 14″ x 2″ which is a large deep canvas by my standards. It began this below.


First stage of Large Textured Landscape


Then I added more colour.


Second stage of Textured Landscape


Next I brushed on some textured paste, my first time using this medium. It has the consistency of thick paint and is opaque white in colour. I worked into the paste once it was on the canvas to created different kinds of textures. It should probably be applied before this much paint has been put on to the canvas but I wanted to make the textures relevant to what is happening in the painting. I have a pet hate for landscape art that uses texture randomly.


Large canvas with texture


Here’s some close ups below.


Close up of texture medium on canvas


Second close up


Next I added more paint.


Next stage of landscape painting


Here’s the piece after a more work (below).  I’ve covered the canvas with colour now and I’ve made this corner on the left darker than I’d originally planned. I’ve also added some green and brown to the pool as I wanted it to have a more murky feel to it.


Finished painting


When I looked back at the last two images, I saw that I had removed most of the green from the clump of grasses on the front right of the canvas so I went back and put some more green back in there.


Landscape with a little more green


I’ve learnt a few things making this painting – the first is that I love working with this textured paste. It brings the piece alive for me by – a bit like modeling with clay ( ahh, I remember those days ). More than that, I’ve learnt to trust this material ( paint ) which probably sounds a bit strange or perhaps too obvious but sometimes the hardest things to grasp are the things that are right in front of our noses! It’s an acceptance of the material and the ability to really work with it, to just go for it without trepidation. I think I’m finally learning to do this and I feel happy with the way the work is progressing at the moment.


Contrast

I started this one with a couple of others recently. It’s loosely based on some pictures I took out on the bog road this month. I think this one is all about contrast – between the black bog and the white/golden grasses, the darkness of the earth itself and the lightness and blueness of the sky and its reflections.

Here’s how it started below.


First stage of January Bog


Here’s how it progressed – I worked this whole piece very wet, playing with the inks and paint and trying to work with their fluid qualities. I love the way they react together, bleeding into each other like glazes fusing in a kiln.


Second stage of January Bog


I’m almost tempted to leave it as it is ( above ) but I go back to it once the colours have dried. I try to put in just a bit more detail and to describe the grasses a bit better and give them more direction..


Finished Landscape - January Bog


While I am quite happy with this one, I almost prefer it at the earlier first stage as pictured above – what do you think?


January Bog

I drove to Galway yesterday and stopped on the way to take some photos just outside Oughterard. It’s a favourite spot of mine – I took some photographs there last Summer. It’s a different place in January but no less beautiful and in fact there’s still a real richness to the colours of the bog and grasses, lovely russety browns and mahogany shades..


Oughterard Bog, second photo


There was very little colour in the sky and this is reflected in the pools of water which have a metallic quality, like liquid silver or mercury. A lovely contrast against the earthy mix of colours around it.


ough 5


Oughterard Bog - photo by Deborah Watkins


There’s a quietness about the place, a stillness, as if the earth still rests. I imagine tiny tendrils underneath, waiting to move upwards and change this place again with a wash of green. Soon..


Oughterard Bog from the N59

January Landscape

I started another landscape based on some photos of the bog I took in the rain this month. I began the piece on the easel and used charcoal and broad brushes with lots of colour – below.


Landscape first stage


The horizontal swipe of orange made me think of Egon Shiele‘s work – something about the combination of black and rust. I had to stop and take a look at his paintings – this one’s called ‘Truth Unveiled

I love the energy in the lines, the scratchiness of them, you can almost feel the hand that made these marks – the daubs and blocks of vivid colour. Wonderful.


Egon Schiele - Truth Unveiled

 Image taken from canvasreplicsa.com


Now back to work! I added more colour and detail to the landscape below, it’s still on the easel so the inks and paint run downwards a bit.


The same landscape with more paint added


I take it off the easel now and do some work on the table, trying to counteract the vertical lines with more horizontal shapes of colour.


Same landscape worked a bit more


I want to darken it a little now so I use some charcoal where the paint is dry, on the hills at the back especially and in the line through the middle of the road.


Next stage of landscape painting


I mark in the fence on the left also with charcoal.


Landscape after more work


I reworked much of the piece ( below) once the paint was dry. The fence is gone and I’ve decided to leave it out. I tried consciously to avoid being precious about what I’d already done, pushing myself to just go ahead and make mistakes – keeping the image of the place in my mind at all times.

I think this is where my greatest weakness is and I’m trying to gain the confidence to finish a painting with the same energy that it had when it began. I’m happier with the results so far and I need to put this painting away now for a few days and come back to it afresh.


Finished Landscape


Irish Folk Furniture


This beautiful Irish film is debuting at the 2013 Sundance Film Festival and is available to watch on YouTube. It’s an animated documentary short directed by Tony Donoghue and was it funded by the Irish Film Board, RTE and the Arts Council. It charts the restoration of sixteen pieces of traditional Irish furniture from the forgotten dusty corners of old sheds back into the homes where they once held pride of place. The film which runs just under nine minutes, took three years to make – the furniture took several months to dry out before it could be worked on and the outdoor animation was often problematic due to the vagaries of the Irish weather.

In an interview ‘Road to Sundance 2013,’ Donoghue described the film as a piece of ‘pro furniture propaganda: an attempt to show the beauty and social significance of this rural furniture’. He talks about the inspiration for the film as the desire to investigate the discarding of furniture that had been part of families for up to 150 years. He found that there is a strong historical association between these old pieces and general hard times but he also talks about the love of the people and their stories – ‘ I was shocked by the beauty of the personal histories associated with every single item.’

It’s a gem of a film and lets hope it gets the success it deserves at Sundance.


http://www.youtube.com/watch?v=KrfDAIqn6KE


Return to Painting

It’s always hard to get back to painting after a break. I’ve had a couple of false starts since Christmas but I have resolved to try to develop the work in a number of ways. I want to make some larger work this year for one and I also want to make my painting looser, less busy, and more expressive somehow. Yes, quite the tall order I have for myself indeed. This will all take time and it’s frustrating to begin with clear ideas like these in mind and then to find that it’s not so easy to translate into something actual straight away. It’s a process of course and it will take time.

So, here’s how my first painting for 2013 began – it’s really more of a sketch because it’s on quite a lightweight paper.  It’s similar to some bog paintings I made at the end of last year although this was not my intention exactly. I used an easel for the initial part of the painting in an effort to keep the composition loose and energetic.


First stage of painting


Now for some more paint..


Second stage of painting


I’m still using the easel at this next stage but I’m finding that the ink is dripping vertically ( of course! ) which is not necessarily where I want it to go.


Third stage of painting


I finish it on the table and I darken the whole piece with more brown and blue. I discover about now that if I use any more paint or ink the page will dissolve in front of me so this is my main reason for stopping!  I’m reasonably satisfied with it at this stage in any case – my problem with it is that it does seem a bit of a muddle in terms of composition. I like the colours and the diagonal thrust of it but it did seem to work better earlier on. What’s your view?  I think I’ve more work to do..


Fourth stage of painting